Move files to and from server scp command
-
SCP or (secure copy) allows you to move files even entire directories to, or from local and or remote hosts, using the same authentication and securtiy levels as SSH.
Copy the file “foobar.txt” from a remote host to the local host
$ scp username@site.com:foobar.txt /local/directoryCopy the file “foobar.txt” from the local host to a remote host
$ scp foobar.txt username@remotehost.com:/path/to/directoryCopy the directory “foo” from the local host to a remote host’s directory “bar”
$ scp -r foo username@remotehost.com:/remote/directory/barCopy the file “foobar.txt” from remote host “site1.com” to remote host “site2.com”
$ scp username@site1.com:/remote/directory/foobar.txt \username@site2.com:/remote/directory/Copying the files “foo.txt” and “bar.txt” from the local host to your home directory on the remote host
$ scp foo.txt bar.txt username@site.com:~Copy the file “foobar.txt” from the local host to a remote host using port 1000 (or whatever ssh port your running on)
$ scp -P 1000 foobar.txt username@site.com:/remote/directoryCopy multiple files from the remote host to your current directory on the local host
    $ scp username@site.com:/remote/directory/\{a,b,c\} .

    $ scp username@site.com:~/\{foo.txt,bar.txt\} .
By default scp uses the Triple-DES cipher to encrypt the data being sent. Using the Blowfish cipher has been shown to increase speed on slower connections. This can be done by using option -c blowfish in the command line.
$ scp -c blowfish file.txt username@site.com:~Use the -C option for compression, and a bit of speed. If you have a fast connection you might not notice much of a difference. However it is a bit more CPU intensive due to the algorithms used to generate the encryption.
Blowfish scp example:
$ scp -c blowfish -C file.txt username@site.com:~

-
Locate hard drive and get information
ls -l /sys/block | grep sd.Output:
lrwxrwxrwx 1 root root 0 Jun 22 06:28 sda -> ../devices/pci0000:00/0000:00:1f.2/ata1/host0/target0:0:0/0:0:0:0/block/sda lrwxrwxrwx 1 root root 0 Jun 22 06:28 sdb -> ../devices/pci0000:00/0000:00:1f.2/ata2/host1/target1:0:0/1:0:0:0/block/sdb lrwxrwxrwx 1 root root 0 Jun 22 06:28 sdc -> ../devices/pci0000:00/0000:00:1f.2/ata3/host2/target2:0:0/2:0:0:0/block/sdc lrwxrwxrwx 1 root root 0 Jun 22 06:28 sdd -> ../devices/pci0000:00/0000:00:1f.2/ata4/host3/target3:0:0/3:0:0:0/block/sddOr for a more detailed view
strace -e trace=open lsblk NAME MAJ:MIN RM SIZE RO TYPE MOUNTPOINTS sda 8:0 0 3.6T 0 disk ├─data--2-data--2_tmeta 252:3 0 15.9G 0 lvm │ └─data--2-data--2-tpool 252:9 0 3.6T 0 lvm │ ├─data--2-data--2 252:10 0 3.6T 1 lvm │ ├─data--2-vm--101--disk--0 252:11 0 8G 0 lvm │ ├─data--2-vm--103--disk--0 252:12 0 32G 0 lvm │ ├─data--2-vm--107--disk--0 252:13 0 500G 0 lvm │ └─data--2-vm--108--disk--0 252:20 0 100G 0 lvm └─data--2-data--2_tdata 252:6 0 3.6T 0 lvm └─data--2-data--2-tpool 252:9 0 3.6T 0 lvm ├─data--2-data--2 252:10 0 3.6T 1 lvm ├─data--2-vm--101--disk--0 252:11 0 8G 0 lvm ├─data--2-vm--103--disk--0 252:12 0 32G 0 lvm ├─data--2-vm--107--disk--0 252:13 0 500G 0 lvm └─data--2-vm--108--disk--0 252:20 0 100G 0 lvm sdb 8:16 0 698.6G 0 disk └─sdb1 8:17 0 698.6G 0 part /mnt/pve/backups sdc 8:32 0 3.6T 0 disk ├─vm--data-vm--data_tmeta 252:4 0 15.9G 0 lvm │ └─vm--data-vm--data-tpool 252:14 0 3.6T 0 lvm │ ├─vm--data-vm--data 252:15 0 3.6T 1 lvm │ ├─vm--data-vm--100--disk--0 252:16 0 270G 0 lvm │ ├─vm--data-vm--102--disk--0 252:17 0 100G 0 lvm │ ├─vm--data-vm--104--disk--0 252:18 0 25G 0 lvm │ └─vm--data-vm--106--disk--0 252:19 0 32G 0 lvm └─vm--data-vm--data_tdata 252:7 0 3.6T 0 lvm └─vm--data-vm--data-tpool 252:14 0 3.6T 0 lvm ├─vm--data-vm--data 252:15 0 3.6T 1 lvm ├─vm--data-vm--100--disk--0 252:16 0 270G 0 lvm ├─vm--data-vm--102--disk--0 252:17 0 100G 0 lvm ├─vm--data-vm--104--disk--0 252:18 0 25G 0 lvm └─vm--data-vm--106--disk--0 252:19 0 32G 0 lvm sdd 8:48 0 931.5G 0 disk ├─sdd1 8:49 0 1007K 0 part ├─sdd2 8:50 0 1G 0 part └─sdd3 8:51 0 930.5G 0 part ├─pve-swap 252:0 0 8G 0 lvm [SWAP] ├─pve-root 252:1 0 96G 0 lvm / ├─pve-data_tmeta 252:2 0 8.1G 0 lvm │ └─pve-data 252:8 0 794.3G 0 lvm └─pve-data_tdata 252:5 0 794.3G 0 lvm └─pve-data 252:8 0 794.3G 0 lvm +++ exited with 0 +++ cat /proc/partitions major minor #blocks name 8 0 3907018584 sda 8 16 732574584 sdb 8 17 732572672 sdb1 8 32 3907018584 sdc 8 48 976762584 sdd 8 49 1007 sdd1 8 50 1048576 sdd2 8 51 975712967 sdd3 252 0 8388608 dm-0 252 1 100663296 dm-1 252 2 8495104 dm-2 252 3 16650240 dm-3 252 4 16650240 dm-4 252 6 3873329152 dm-6 252 5 832888832 dm-5 252 7 3873329152 dm-7 252 8 832888832 dm-8 252 9 3873329152 dm-9 252 10 3873329152 dm-10 252 11 8388608 dm-11 252 12 33554432 dm-12 252 13 524288000 dm-13 252 14 3873329152 dm-14 252 15 3873329152 dm-15 252 16 283115520 dm-16 252 17 104857600 dm-17 252 18 26214400 dm-18 252 19 33554432 dm-19 252 20 104857600 dm-20Locate drive by serial and model information
hdparm -i /dev/sda /dev/sda: Model=WDC WD4000FYYZ-05UL1B0, FwRev=00.0NS05, SerialNo=WD-WCC132262513 Config={ HardSect NotMFM HdSw>15uSec SpinMotCtl Fixed DTR>5Mbs FmtGapReq } RawCHS=16383/16/63, TrkSize=0, SectSize=0, ECCbytes=0 BuffType=unknown, BuffSize=unknown, MaxMultSect=16, MultSect=off CurCHS=16383/16/63, CurSects=16514064, LBA=yes, LBAsects=7814037168 IORDY=on/off, tPIO={min:120,w/IORDY:120}, tDMA={min:120,rec:120} PIO modes: pio0 pio3 pio4 DMA modes: mdma0 mdma1 mdma2 UDMA modes: udma0 udma1 udma2 udma3 udma4 udma5 *udma6 AdvancedPM=yes: unknown setting WriteCache=disabled Drive conforms to: Unspecified: ATA/ATAPI-1,2,3,4,5,6,7 * signifies the current active mode
-
Screen recording can use webm as their format, it can be more simple to use a gif to embed into a website or forum, than adding scripts to host different video format.
In this case I grabbed a screen record of the progress for writing zeros to a hard drive with dd
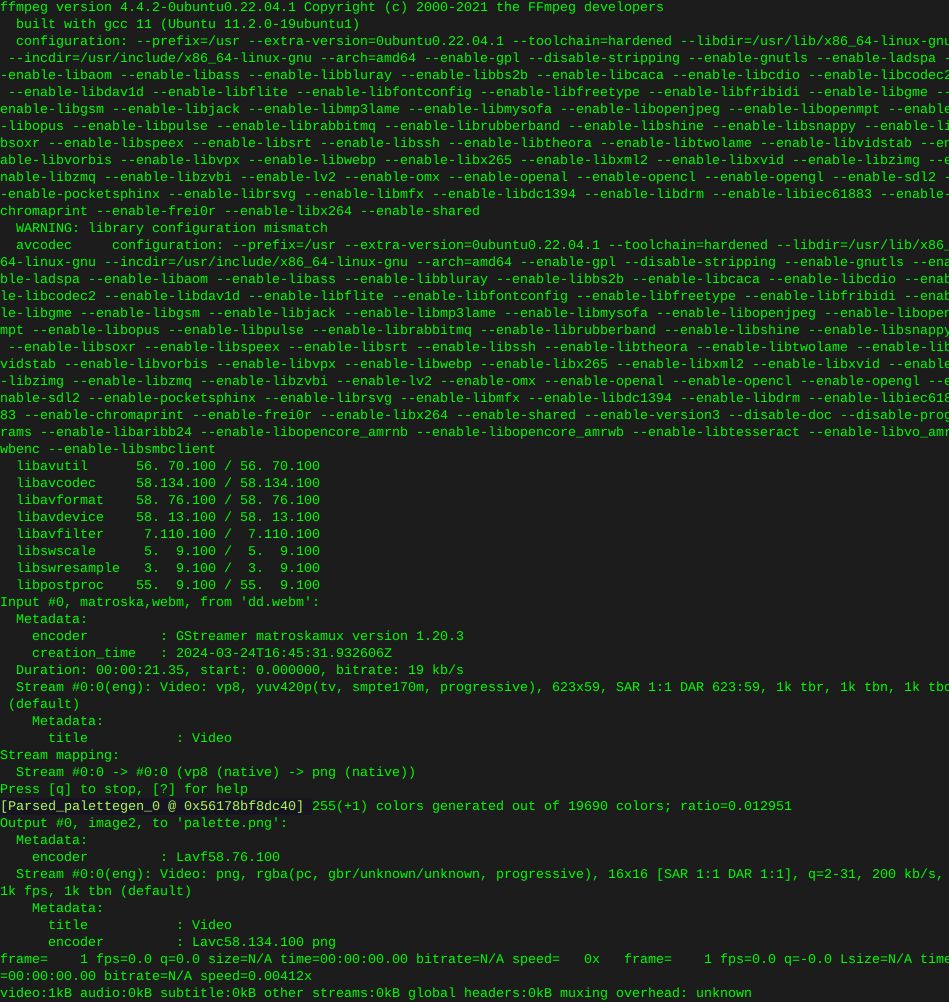
Use ffmpeg to convert webm to gif:
First create a pallet:
Move into the directory which the webm is located, or type in the path
Where ‘dd.webm’ is the screen recording
ffmpeg -y -i dd.webm -vf palettegen palette.pngOutput:
Then convert the webm to gif:
ffmpeg -y -i dd.webm -i palette.png -filter_complex paletteuse -r 10 dd.gif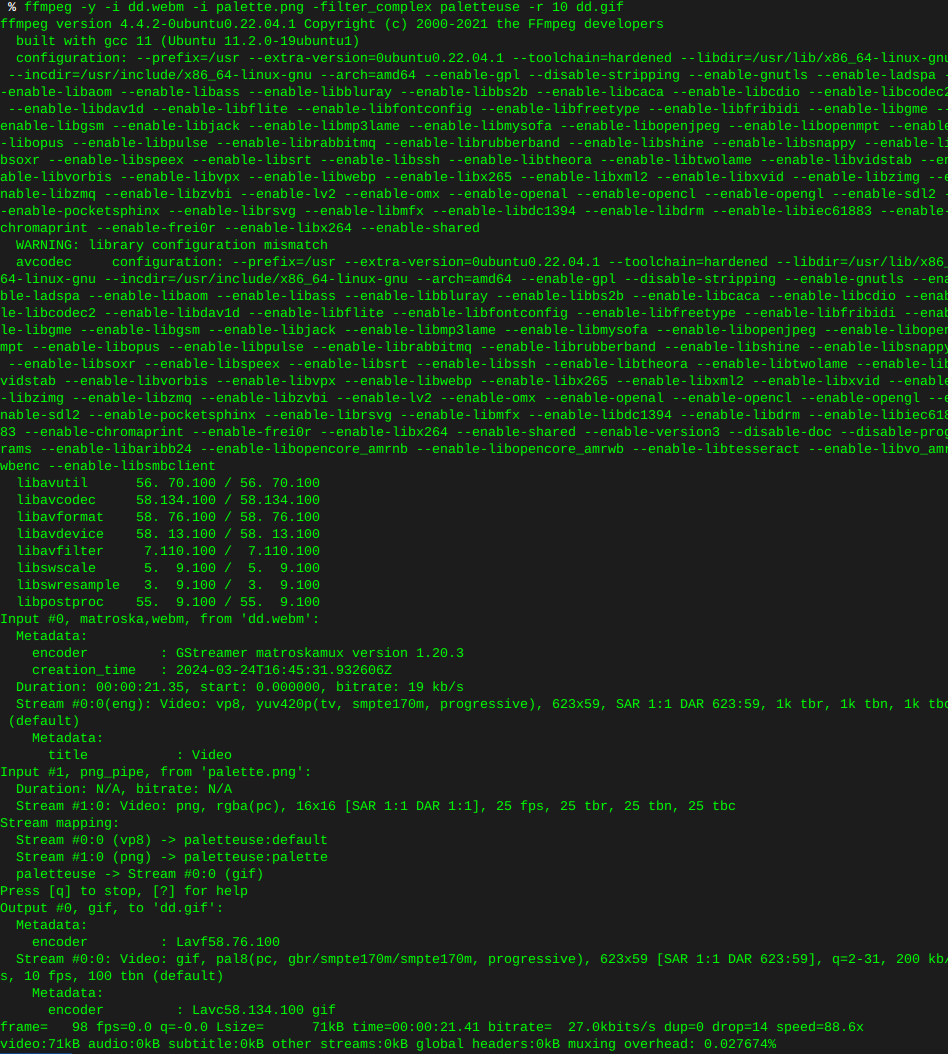
This is what I ended up with, looks like any image of any alien on the interwebz, as if shot through a potato, some tweaking of the command is in my future. None the less.

-
Write zeros to all sectors
Use the command ‘lsblk’ to find the drive you wish to erase
I’m using ‘dd’ to erase things
In this case I’m torching sdb
Only use status=progress if you care it’s not necessary
dd if=/dev/zero of=/dev/sdb bs=12M status=progress
-
Remove old kernel images that are cluttering the system
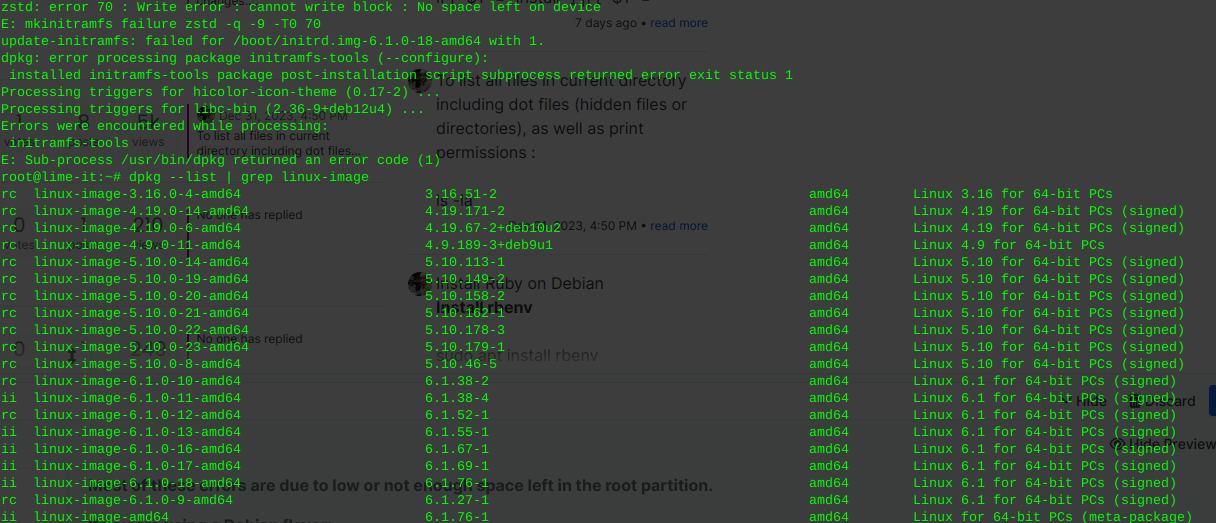
Most of these errors are due to low or not enough space left in the root partition.
If you are using a Debian flavor:
sudo apt-get autoremove --purge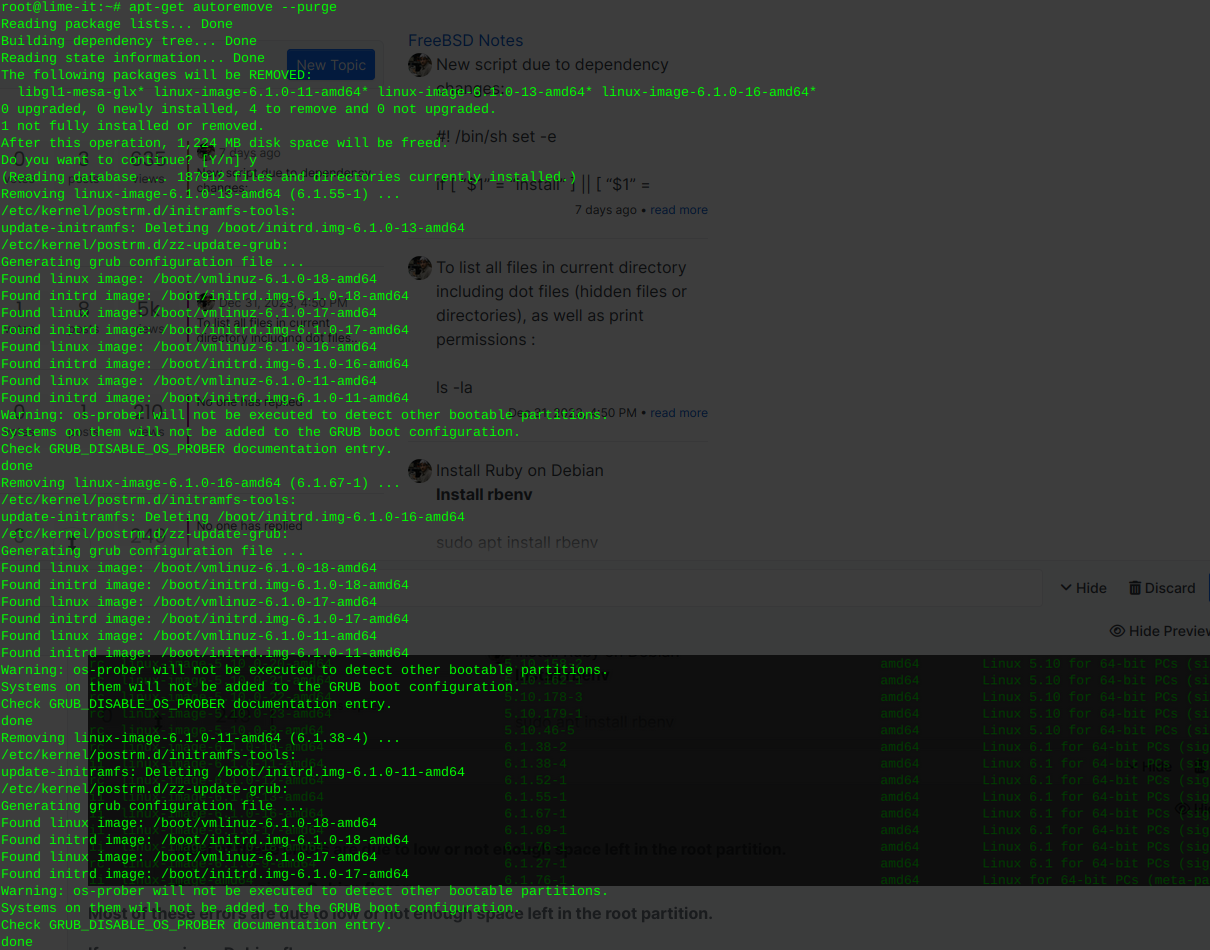
Inform grub whenever an old kernel is removed:
update-grub
Remove the un-used kernel config files:
These will be the files pre cursed as ‘rc’ where installed kernels use ‘ii’
… As well as files no longer used or required due to dependencies
This command will detect, print, and remove left over cruft from previously installed packages or scripts, that have been removed or updated.
sudo dpkg --purge $(dpkg -l | awk '/^rc/{print $2}')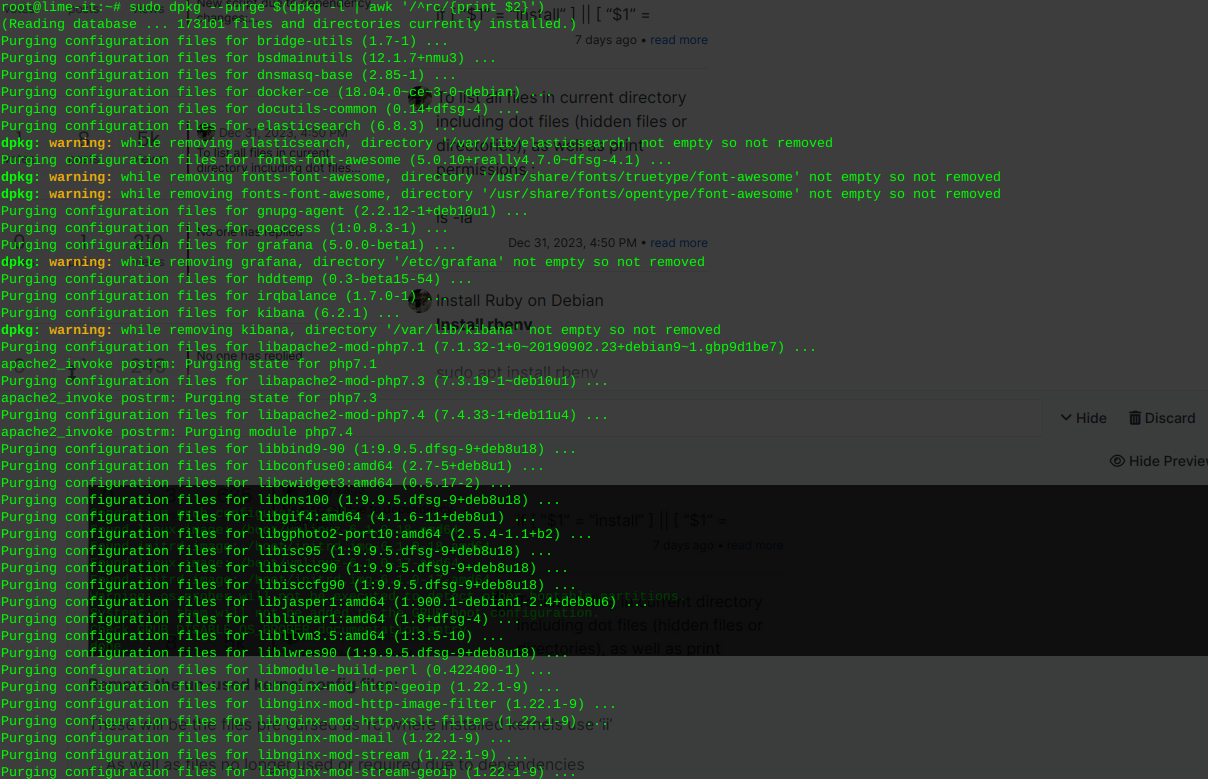
You can re-run the following to view the installed kernel(s):
dpkg --list | grep linux-image
-
To list all files in current directory including dot files (hidden files or directories), as well as print permissions :
ls -la